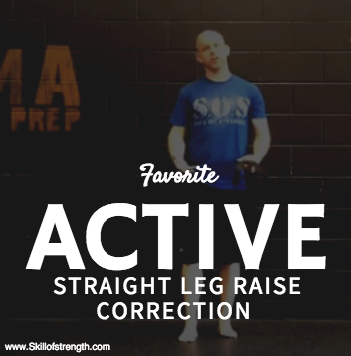
Today we’ll go over my favorite active straight leg raise correction (ASLR).
I’m a huge fan of the functional movement screen. My first FMS certification was at the Reggie Lewis Center in Boston around 2008.

Since then, I’ve been using it with all of my clients.
We utilize the entire screen at Skill of Strength, but we need to start with what’s most important.
The active straight leg raise pattern is an invaluable assessment and is at the top of the list when it comes to the corrective algorithm suggested by FMS.
The Active Straight Leg Raise (ASLR) screen assesses:
- Active mobility in the flexed hip while simultaneously assessing available extension in the opposing hip
- Overall pelvic stability
- The ability to separate the lower extremities in an unloaded position
Owning this pattern is vital to health and performance. This pattern affects your ability to walk, jog, run, deadlifts, squat, lunge. If you have a poor active straight leg raise pattern or a large asymmetry within the pattern, there could be potentially negative consequences.
At Skill of Strength, we’ve developed the following progressions to help our clients regain their active straight leg raise pattern.
How to Regain Your Active Straight Leg Raise Pattern
Step #1
Start with 2 to 3 minutes of diaphragmatic breathing. Let’s be honest, spending 2 to 3 minutes to reset your breathing is not much of a task.
Step #2
Address soft tissue! Spend some time with the foam roller, a lacrosse ball or your favorite tool and hit the following muscles.
- bottom of foot
- all aspects of the calves
- hip flexor
- all aspects of the quads
- TFL
- glute medius
- Iliacus
- IT band
Step #3
Once you address the breathing and soft tissue work, it’s time to get into the drill and the video!
* Please note, often times, clients who have a less-than-optimal active straight leg raise pattern can present with very tight hip flexors and quads. Addressing the restrictions in the hip flexors and quads is vital to improving this pattern. We did not cover this in the video, but be sure that you address this issue when working with your clients.
Here’s the progression from the video:
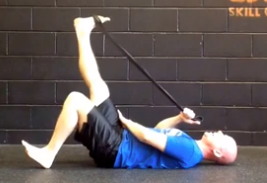
1. Perform 10 hamstring drives with the stretch band. The goal is to get a light stretch in the top position every time. Make sure the opposing leg is flat and both knees are locked.
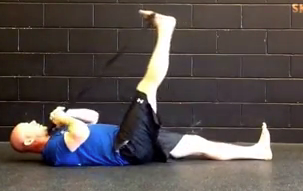
2. Once you do the 10 hamstring drives, perform 10 toe pumps. This is done to a point where you feel a good stretch, but you’re never working into pain. You will notice that when you dorsiflex the ankle, the stretch increases. If you have never done these before, make sure you ease into these.
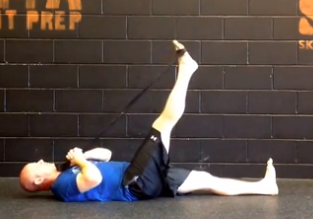
3. After toe pumps, perform 10 opposing leg lowers.
Start at the top position, and lower the leg that does not have the band on it. Bring that leg back up while driving your lower back into the ground fairly hard. This should challenge your core! If you don’t feel anything, you are probably not pushing your lower back flat. Once you get to the top position, stretch both legs out at the top, but be sure that your sacrum does not rise off of the ground.
It’s imperative that the lower back stays flat for the duration of the leg lowers. Locking down the pelvis and lumbar spine is vital to improving this pattern!
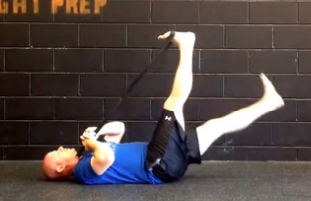
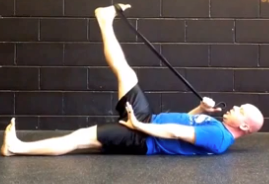
4. The last part of this corrective exercise for ASLR is heel drives. The start position is very different than the other drills. You will start with both hips flexed. The leg with the band on it will be in a similar position to where it was on the other drills.
Before you slide the opposing heel outwards, it’s important to press the lower back flat and maintain good lumbopelvic stability.
We never want to compromise the integrity of the lumbar spine when trying to improve any type of hip mobility. Often times, you will hear coaches referring to a corrective exercise addressing a mobility or stability issue. In many cases the less than optimal pattern is due to mobility and stability. When we “lock down” the pelvis and lumbar spine, we are providing stability to an area. This stabilization allows us to increase flexion in the top leg which results in increased mobility.
You will basically be performing 40 reps total in this progression.
- If you have a score of a 1/1, perform this identically on the opposing side.
- If you have a glaring asymmetry, seek out a good strength coach who can help you with this.
As always, train smart, train hard!
For more information about the FMS, check out www.functionalmovement.com.
To purchase the stretch band used in this video, please visit www.performbetter.com.
One Comment
Comments are closed.