You’ve got a heart rate monitor. You’re strapped in and ready to go, but what the heck do the numbers really mean anyway and why should you care about heart rate monitor training anyway?
At Skill of Strength, we installed an in-house heart rate monitoring system a few months ago.
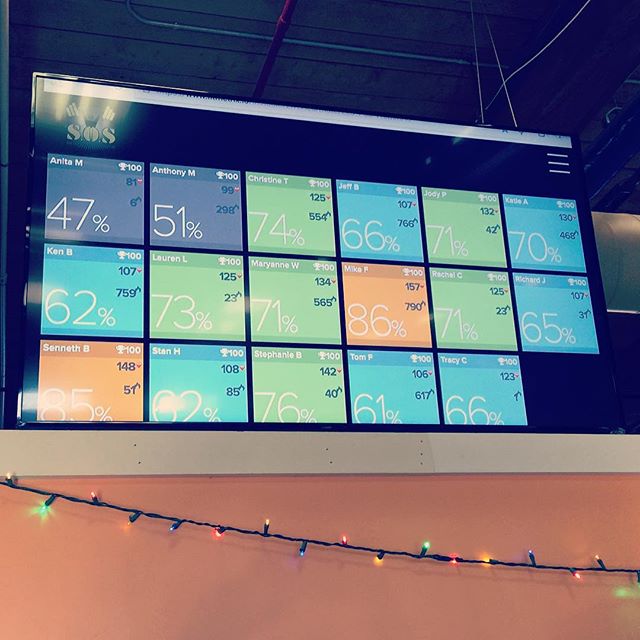
While most of you have a fairly decent idea of how to utilize the system, I figured it would be good to give our members some simple tips on how to use this information.
Our heart rate monitor training system gives you three different metrics during your workout:
1. Current Heart Rate. This is your actual heart rate in real-time
2. Heart Rate Zone. This is color-coded and gives you a rough estimate of what zone you are in. I will dive into this in a little bit.
3. Estimated Calories Burned. This gives you a basic idea of approximately how many calories you’ve burned during the session and our software will email you your final calories burned post training session.
We can’t promise you’ll burn as many calories as Kiley did yesterday though!
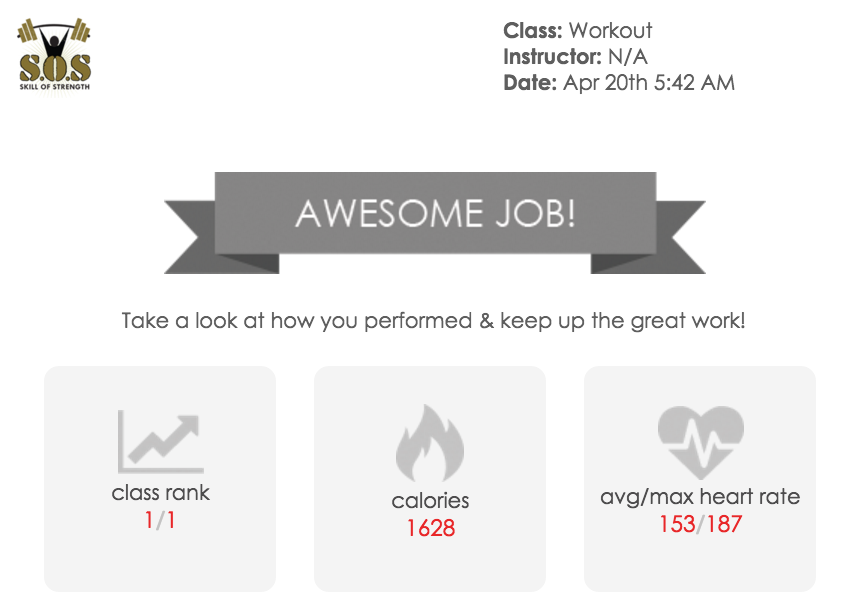 (Post class email for our members!)
There are several different ways to determine maximum heart rate. Our system uses age, gender, and body weight to establish each member’s estimated max target heart rate. It’s not perfect, but it’s a starting point and when necessary, we simply adjust the maximum target heart rate number for some clients.
So what do the numbers on your heart rate monitor mean and why should you care?
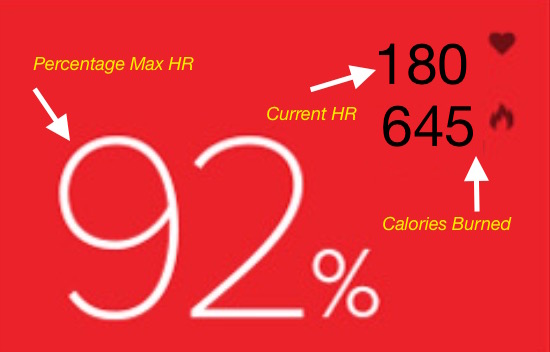
I’m also including colors here as our system at Skill of Strength is color-coded for our members!
Resting Heart Rate – Gray
Zone 1 (0-60%)
This is when you are resting or using little effort. For example, you will be in the gray zone right when you walk into the gym.
Hopefully your heart rate is not ever at zero 😉
The Recovery Zone – Blue
Zone 2 (61-71%)
In the recovery zone, or zone 2, your heart rate is between 61 and 70% of your max.
If your goal is to develop maximum strength or power, you always want to recover to this zone before your next set.
Note: This is for full recovery and some people may not drop down to blue in a class setting.
The Aerobic Zone – Green
Zone 3 (72-80%)
In the aerobic zone, your heart rate is between 71 and 80% of your max heart rate.
If your goal is to develop your aerobic base without overtraining, you want to keep your heart rate in this zone for the majority of your training. Keep in mind, this is not high-intensity training, but is sustainable for hours.
Most people will live in either the blue or green zone when strength training. Sure, there are times when your heart rate will elevate to orange or red, but for the most part, you will live here.
If you want to make the most out of your strength training, make sure you recover to either green or blue before starting your next set.
The Anaerobic – Orange
Zone 4 (81-91%)
In the anaerobic zone, your heart rate is between 81 and 91% of your max heart rate.
During the metabolic conditioning component of our Skill of Strength classes, you’ll see your heart rate in this zone quite a bit. In this zone, you’ll experience muscular fatigue and heavy breathing.
Due to fatigue, it’s important to maintain proper technique and form. Exercises like rowing and biking are a perfect fit for training in this zone due to the minimal skill set required to drive heart rate. If an exercise is too complex, there’s a greater change you’ll display poor technique when trying to keep your heart rate elevated in the anaerobic zone.
When strength training, you do not want to live in the orange zone. If you find you are spending a lot of time in the orange during strength training, you either need to rest longer or decrease the weight you’re lifting.
Remember, if your goal is strength, you need to rest!
Zone 5 (92-100%) – Red
Max Effort Zone
Consider the red zone the max effort zone. This is when your heart rate is between 92 and 100% of your max heart rate.
You might peak into the red during some tough intervals, but you should not be living in the red zone. You will see red when performing exercises at maximum intensity for :30 or longer.
Just as with the anaerobic zone, or the orange zone, it’s important to focus on proper exercise technique when you’re driving your heart rate. It’s important to listen to your body in this zone and never push the envelope.
There are certain times when we are looking for a desired training effect. In these cases, we will have a client work up to the red zone and recover back down to 70% and repeat the task.
It’s important that you recover after peaking into the red so there isn’t too much stress on the body.
So there you have it…a quick and easy template on how to use our heart rate monitoring system to get the most out of your training.
Let us know if we can help you achieve your goals!
That system in the picture looks awesome. Is that on a computer screen, or like a big screen TV in the training area. Either way individual heart rate monitoring linked to group training isn’t something I have seen a lot of and is really cool.
Great post! This is one of the many reasons we love Skill of Strength. They provide intelligent training supported by great tools education to help us understand how to maximize our results.